Einrichtung von Outlook: Difference between revisions
No edit summary |
|||
| Line 35: | Line 35: | ||
* Select Synchronization Profiles and Add new Profile. |
* Select Synchronization Profiles and Add new Profile. |
||
* Horde calendar is a Generic CalDAV/CardDAV calendar. |
* Horde calendar is a Generic CalDAV/CardDAV calendar. |
||
* Press the three dots beside Outlook folder name, give it name, select your Horde-mail-account and click new to create a new folder. Name this folder an select where it shell be created. (It's always safed on the PC but everytime synchronized with the calender data on Horde.) |
|||
* Name it and select that it is a calendar. |
|||
* Open the settings about the calendar you like to add on Horde on the server and copy the first CalDAV address. |
* Open the settings about the calendar you like to add on Horde on the server and copy the first CalDAV address. |
||
* Add this address as DAV URL, enter you KIP username and the password for it and your mail address from KIP. |
* Add this address as DAV URL, enter you KIP username and the password for it and your mail address from KIP. |
||
* Now you can check if the settings are correct with the check settings button. |
* Now you can check if the settings are correct with the check settings button. |
||
* Open the advanced settings and configure the Sync Settings. |
* Open the advanced settings and configure the Sync Settings. |
||
* If it's not shown directly in the calendar list right click on My Calendar, select Add calendar, From Addressbook, select the ldap server, open the windows for a detailed, enter your KIP username als displayed name and select your account. Now press on the calendar button and on OK. Now Outlook restarts and your calendar should be shown. |
|||
===Outlook 20XX unter Windows einrichten=== |
===Outlook 20XX unter Windows einrichten=== |
||
Revision as of 12:00, 25 April 2024
Outlook 2021 unter Windows 10 Enterprise einrichten
- The first time Outlook is started a box to enter your mail address is shown -> enter it and activate that you like to configure it manually.
- In the following windows you can enter whatever you will as password - alter you have to enter the correct one.
- Now Outlook tries to open a connection to the server - that will not work. Select that you will setup an IMAP account.
- The server-settings you've to insert:
server to receive mails: mail.kip.uni-heidelberg.de
port: 993
encryption: SSL/TLS
server to send mails: mail.kip.uni-heidelberg.de
port: 465
encryption: SSL/TLS
- Enter the username of your KIP-account and the password
- Deactivate that you also like to setup Outlook Mobile
Outlook offers also to add the address book of KIP. To do this:
- Open the mail configuration tool on the start page.
- Select address book and click on add.
- Select LDAP.
- As display name you enter the server address ldap.kip.uni-heidelberg.de.
- As connection details enter 636 as port.
Now you can use this address book after clicking the symbol beside search person in the menu on the top. Then select the address book ldap.kip.uni-heidelberg.de and use the search option. The account that are shown you can add to your local address book - than you don't have to use the KIP address book all the time.
Additionally you can add your online calendar of Horde on mail.kip.uni-heidelberg.de to Outlook:
- First download and install the CalDav Synchronizer.
- Select Synchronization Profiles and Add new Profile.
- Horde calendar is a Generic CalDAV/CardDAV calendar.
- Press the three dots beside Outlook folder name, give it name, select your Horde-mail-account and click new to create a new folder. Name this folder an select where it shell be created. (It's always safed on the PC but everytime synchronized with the calender data on Horde.)
- Open the settings about the calendar you like to add on Horde on the server and copy the first CalDAV address.
- Add this address as DAV URL, enter you KIP username and the password for it and your mail address from KIP.
- Now you can check if the settings are correct with the check settings button.
- Open the advanced settings and configure the Sync Settings.
- If it's not shown directly in the calendar list right click on My Calendar, select Add calendar, From Addressbook, select the ldap server, open the windows for a detailed, enter your KIP username als displayed name and select your account. Now press on the calendar button and on OK. Now Outlook restarts and your calendar should be shown.
Outlook 20XX unter Windows einrichten
Wer Outlook nutzen möchte und KIP-Mail nutzen will kann auch hier auf die IMAP Technik, für den Online-Zugriff auf die Mailbox, zurückgreifen.
Das IMAP Verfahren, gibt Ihnen die Möglichkeit mit vielen anderen Programmen und auch unserem Webmailer HORDE auf Ihre Mails zuzugreifen, gleichzeitig aber ihre Mails an einem zentralen Ort sicher zu belassen. Natürlich werden die Mailkonten jede Nacht von uns gesichert, so dass Sie sich auch nicht mehr um ein Backup kümmern müssen.
Einrichten von Outlook über die Systemsteuerung:
Öffnen Sie die Systemsteuerung. Gehen Sie entweder in die klassische Ansicht bzw. Klicken Sie in der Explorerleite auf "Alle Systemsteuerungselemente anzeigen" (Win7/Vista).
Siehe: ![]()
Klicken Sie auf das Icon "Mail".
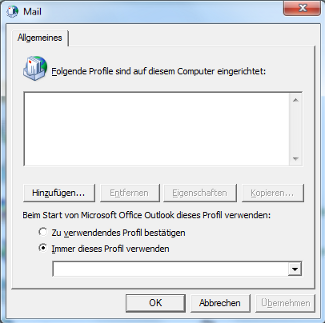
Jetzt sehen Sie folgendes Fenster:
Wenn Sie noch kein Outlook Profil haben können Sie dort ein neues erstellen. Sie werden sofort nach einem Profil Namen gefragt.
Falls Sie schon ein Konto in Outlook konfiguriert haben, müssen Sie auf hinzufügen klicken.
Wenn Sie ein Profil eingerichtet haben oder schon hatten, erscheint nach hinzufügen ein Einrichtungsassistent, in dem Sie erstmal Ihren Namen eingeben. Klicken Sie auf "Servereinstellungen Manuell Konfigurieren", bevor Sie auf Weiter klicken.
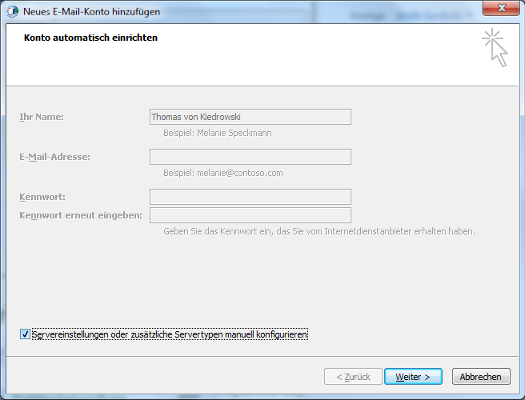
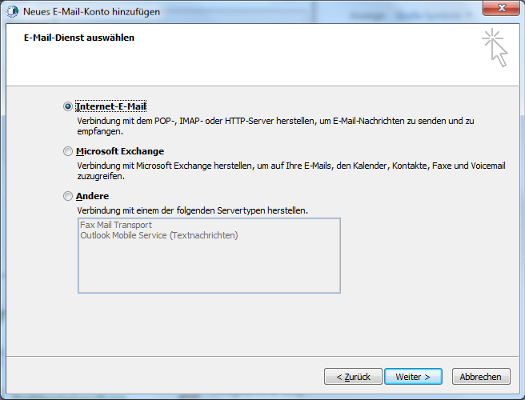
Jetzt auf Internet Mail klicken, dann auf Weiter...
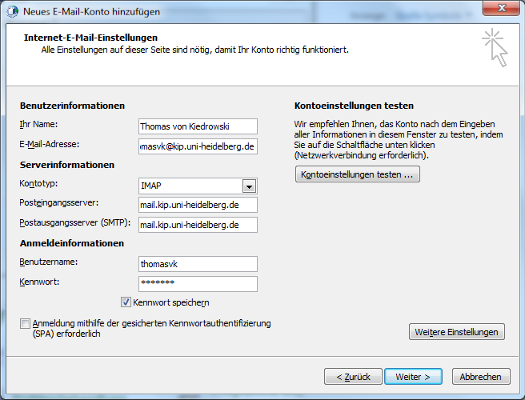
Geben Sie in der dritten Maske folgen Daten ein:
Ihr Name: (Sollte schon eingegeben sein)
E-Mail-Adresse: Ihre Mail-Adresse
Kontotyp: Auf IMAP setzen. !!!Wichtig!!!
Posteingangsserver: mail.kip.uni-heidelberg.de
Postausgangsserver: mail.kip.uni-heidelberg.de
Anmeldeinsfomationen:
KIP-Benutzername mit dem dazugehörigen KIP-Passwort
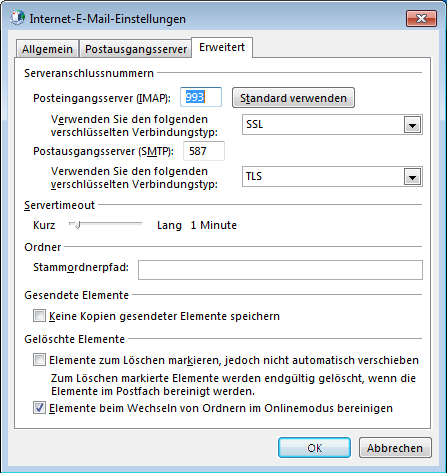
Klicken Sie auf "Weitere Einstellungen" und im neuen Fenster auf Erweitert.
Setzen Sie, wie im Bild zu sehen, IMAP auf SSL, Port 993 und den Postausgangserver auf TLS, Port 587
Jetzt noch im Reiter Postausgangsserver die Authentifizierung einstellen:
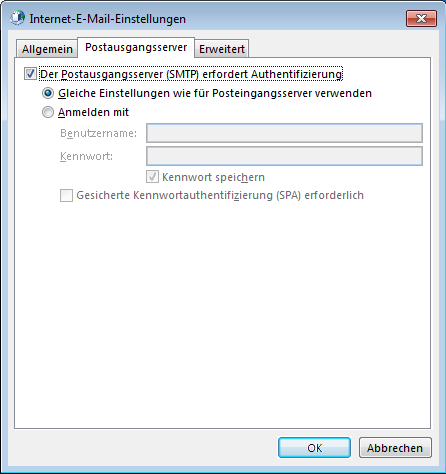
Beenden Sie den Assitenten. Klicken Sie dazu auf Ok.
Imap Ordner verwalten
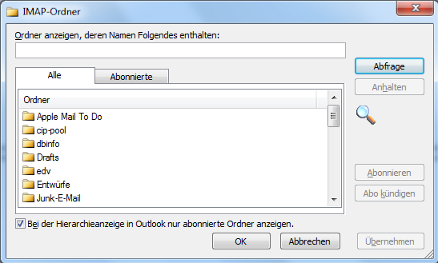
Ordner auf die man mit Imap zugreift, heißen Abonnierte Ordner. Sie können Ordner auch ausblenden in dem Sie sie abbestellen. Freigegebene Ordner anderer Benutzer können auch eingesehen werden. Dazu muss der Benutzer, von dem Sie die Ordner sehen möchten, sich unter unserem Webmailer Horde einloggen und unter den Webmail-Einstellungen kann er dann Ordner für Ihren Benutzernamen explizit frei geben. Damit Sie nun diesen Order in Ihrem Konto sehen können müssen Sie sich den Ordner abonnieren.
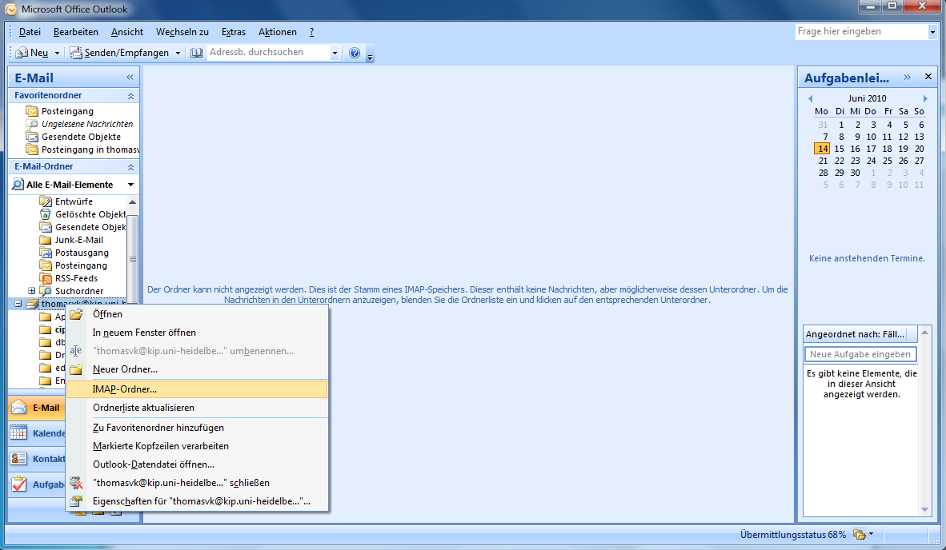
Mit Rechtsklick auf den Servereintrag in der Ordnerstruktur von Outlook, bekommen Sie ein Kontextmenü. Darüber können sie den Imap Ordner Assistenten aufrufen.
Des weiteren gibt es dort den Eintrag: "Ordnerliste aktualisieren", dies kann sehr hilfreich sein, wenn sich bestimmte Ordner nicht mehr finden lassen. Des bewirkt einen Neuaufbau der lokalen Indexdatei.
Wenn Sie auf Abfrage klicken, sucht der Assistent nach allen für Sie freigegebenen Ordnern. Diese können Sie dann abonnieren oder abbestellen.
