EDV:VPN: Difference between revisions
From KIP Wiki
⧼kip-jumptonavigation⧽⧼kip-jumptosearch⧽
(Created page with "=== Windows === -> EDV:Windows Remote Desktop === macOS === ===== Cisco Anyconnect ===== Cisco Anyconnect is needed to establish VPN connections provided by the URZ. Y...") Â |
|||
| Line 20: | Line 20: | ||
* now click on „verbinden kipvpn“/“connect kipvpn“, enter your KIP-username and the password, on the message you can select „Nicht mehr bei DNS-Probleme jeglicher Konfiguration warnen“/“Do not warn about this again for any configuration“ and press “Ok“ |
* now click on „verbinden kipvpn“/“connect kipvpn“, enter your KIP-username and the password, on the message you can select „Nicht mehr bei DNS-Probleme jeglicher Konfiguration warnen“/“Do not warn about this again for any configuration“ and press “Ok“ |
||
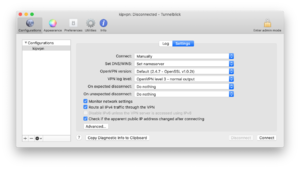
* click on „Einstellungen“/“Settings“ beside „Log“ at the top and select „Sämtlichen IPv4-Datenverkehr durch das VPN leiten“/“Route all IPv4 traffic through the VPN“ |
* click on „Einstellungen“/“Settings“ beside „Log“ at the top and select „Sämtlichen IPv4-Datenverkehr durch das VPN leiten“/“Route all IPv4 traffic through the VPN“ |
||
[[File:Tunnelblick-settings.png|300px|thumb|left]] |
|||
* now you can select „verbinden“/“Connect“ to establish a connection to he KIP-network |
* now you can select „verbinden“/“Connect“ to establish a connection to he KIP-network |
||
* don’t forget to close it, click „trennen“/“Disconnect“ |
* don’t forget to close it, click „trennen“/“Disconnect“ |
||
Revision as of 15:41, 19 March 2020
Windows
macOS
Cisco Anyconnect
Cisco Anyconnect is needed to establish VPN connections provided by the URZ. You can download it directly on their server (you have to login with the URZ-account). After installing it you have to chose "Uni-Heidelberg - vpnsrv1" as server and connect by "<KIP-username>@kip.uni-heidelberg.de" as user and your KIP-password.
kipvpn
kipvpn.kip.uni-heidelberg.de ist a server of the KIP to establish OpenVPN connections. You can download the needed software and configuration on portal.
- download „Tunnelblick_3.8.1_build_5400.dmg“ listet at „Mac OS-X - Tunnelblick“ and the configuration files by downloading „Alle Dateien in einer ZIP-Datei“. After downloading them unpack each of the configuration-files in the same folder
- edit the file „kipvpn.ovpn“ and remove „c://Programme/OpenVPN/config/“ before each filename and save it
- install Tunnelblick
- on the first start select „Ich habe Konfigurationsdateien“/“I have configuration files“ -> and in the next windows „OK“
- select „kipvpn.ovpn“ in the browser and move it to the window of tunnelblick or the symbol of Tunnelblick on the top right and select to install it for one/every user
- now click on „verbinden kipvpn“/“connect kipvpn“, enter your KIP-username and the password, on the message you can select „Nicht mehr bei DNS-Probleme jeglicher Konfiguration warnen“/“Do not warn about this again for any configuration“ and press “Ok“
- click on „Einstellungen“/“Settings“ beside „Log“ at the top and select „Sämtlichen IPv4-Datenverkehr durch das VPN leiten“/“Route all IPv4 traffic through the VPN“
- now you can select „verbinden“/“Connect“ to establish a connection to he KIP-network
- don’t forget to close it, click „trennen“/“Disconnect“
