EDV:OpenAFS/Windows/Windows 10 Home: Difference between revisions
From KIP Wiki
ā§¼kip-jumptonavigationā§½ā§¼kip-jumptosearchā§½
No edit summary |
No edit summary |
||
| Line 3: | Line 3: | ||
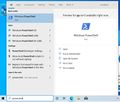
* start "Windows PowerShell" as Administrator |
* start "Windows PowerShell" as Administrator |
||
* enter "Get-SmbServerConfiguration | Select EnableSMB1Protocol" |
* enter "Get-SmbServerConfiguration | Select EnableSMB1Protocol" |
||
<gallery> |
|||
| ⚫ | |||
| ⚫ | |||
</gallery> |
|||
==== Install the OpenAFS Client ==== |
==== Install the OpenAFS Client ==== |
||
| Line 14: | Line 19: | ||
<gallery> |
<gallery> |
||
| ⚫ | |||
| ⚫ | |||
Enable "Authentication for AFS".jpg |
Enable "Authentication for AFS".jpg |
||
Additional AFS Settings.jpg |
Additional AFS Settings.jpg |
||
Revision as of 14:20, 5 May 2021
activate SMB1
- start "Windows PowerShell" as Administrator
- enter "Get-SmbServerConfiguration | Select EnableSMB1Protocol"
Install the OpenAFS Client
- download the OpenAFS for Windows client from openafs.org/windows (5th march 2021 available: version 1.7.3100)
- run the installer and chose "Custom" as setup type
- enable additinally the installation of "Authentication for AFS"
- configure the client with "kip.uni-heidelberg.de" as default cell, "Integrated logon" disabled, "AFS crypt security" enabled, "Freelance mode" disabled and "Lookup cells in DNS" enabled.
- now you can set different options - if the location of you machine is not only in KIP and not always connected to the internal network and the username and password is not equal to the KIP account, you should deactivate "Auto initialize AFS Credentials"
- after a reboot the AFS Client is running and you can open it in the taskbar to establish a connection


