Einrichtung von Thunderbird: Difference between revisions
From KIP Wiki
⧼kip-jumptonavigation⧽⧼kip-jumptosearch⧽
mNo edit summary |
 |
||
| (12 intermediate revisions by 5 users not shown) | |||
| Line 1: | Line 1: | ||
| ⚫ | |||
= Email Server Settings = |
|||
Um ein KIP-Mail Konto in Thunderbird, ab Version 3 einzurichten, müssen Sie vorher Wissen ob Sie Ihre Mails vom Server herunterladen möchten (POP), oder ob Sie Ihre Mails auf dem Server belassen möchten um diese nur zu bearbeiten (IMAP). Das IMAP Verfahren, gibt Ihnen die Möglichkeit mit vielen anderen Programmen und auch unserem Webmailer HORDE auf Ihre Mails zuzugreifen, gleichzeitig aber ihre Mails an einem zentralen Ort sicher zu belassen. Natürlich werden die Mailkonten jede Nacht von uns gesichert, so dass Sie sich auch nicht mehr um ein Backup kümmern müssen. |
|||
For general information see the [https://support.mozilla.org/de/products/thunderbird Mozilla Support page for Thunderbird], |
|||
Das Verfahren der Wahl ist somit IMAP. |
|||
or the [https://support.mozilla.org/en-US/kb/manual-account-configuration Manual Account Configuration page] |
|||
== PROXY settings == |
|||
Diese Anleitung gilt in wesentlichen Teilen auch unter Windows. |
|||
go to '''Edit -> Preferences -> Advanced -> Network & Disk Space -> Settings..(Connection)''' |
|||
and configure Automatic: '''http://www.kip.uni-heidelberg.de/proxy''' |
|||
Nach dem ersten Starten von Thunderbird erscheint folgendes Fenster: |
|||
== Incoming IMAP == |
|||
Server: '''imap.kip.uni-heidelberg.de''' |
|||
[[File:Thunderbird_Konto_1.png]] |
|||
Encryption: '''SSL/TLS''' on Port: '''993''' |
|||
Hier geben Sie ihren Namen, Ihre E-Mail Adresse und Ihr KIP Passwort an. |
|||
Authentication: '''normal password''' |
|||
[[File:Thunderbird_Konto_2.png]] |
|||
== Outgoing SMTP == |
|||
Server: '''smtp.kip.uni-heidelberg.de''' |
|||
Encryption: '''SSL/TLS''' on Port: '''587''' |
|||
Authentication: '''normal password''' |
|||
| ⚫ | |||
* After the first time you start Thunderbird, the "Welcome to Thunderbird" window appears. |
|||
There you may klick the '''"Skip this and use my existing email"''' button. |
|||
* In the next window klick the '''"Manual config"''' button to get the following window, |
|||
where you can setup the configuration of your email-client as follows: |
|||
[[Image:Thunderbird-server-settings.png]] |
|||
You can also install Lightning a [[EDV:MUA/Thunderbird-Kalender|Thunderbird-Calendar]] or [[LDAP Verzeichnis einbinden| integrate LDAP directory]] |
|||
Latest revision as of 09:51, 4 November 2024
Email Server Settings
For general information see the Mozilla Support page for Thunderbird, or the Manual Account Configuration page
PROXY settings
go to Edit -> Preferences -> Advanced -> Network & Disk Space -> Settings..(Connection)
and configure Automatic: http://www.kip.uni-heidelberg.de/proxy
Incoming IMAP
Server: imap.kip.uni-heidelberg.de
Encryption: SSL/TLS on Port: 993
Authentication: normal password
Outgoing SMTP
Server: smtp.kip.uni-heidelberg.de
Encryption: SSL/TLS on Port: 587
Authentication: normal password
Thunderbird KIP-Email Setup
- After the first time you start Thunderbird, the "Welcome to Thunderbird" window appears.
There you may klick the "Skip this and use my existing email" button.
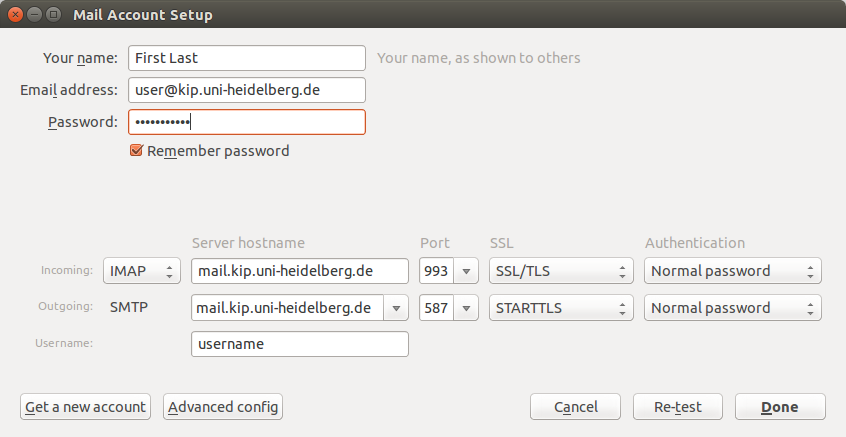
- In the next window klick the "Manual config" button to get the following window,
where you can setup the configuration of your email-client as follows:
You can also install Lightning a Thunderbird-Calendar or integrate LDAP directory
